A Comprehensive Guide to powercap-utils on Linux
1. Introduction: What is powercap-utils?
powercap-utils is a suite of user-space command-line tools for Linux that allow you to interact with the kernel’s Power Capping Framework. This framework provides a standardized way to monitor and limit the power consumption of hardware devices.
Its most common use is to control Intel’s Running Average Power Limit (RAPL) and AMD’s RAPL-like features on modern CPUs. These features let you directly set power budgets for the CPU package, its cores, and DRAM.
2. Prerequisites and Installation
Prerequisites
- A Linux System: Any modern Linux distribution.
- Supported Hardware:
- Intel Sandy Bridge and newer processors.
- Modern AMD Zen-based processors.
- Kernel Support: The
intel_rapl(for Intel) oramd_energy(for AMD) kernel module must be loaded. This is typically automatic.
Installation
The package name is usually powercap-utils.
- On Debian / Ubuntu:
sudo apt update sudo apt install powercap-utils - On Fedora / CentOS / RHEL:
sudo dnf install powercap-utils - On Arch Linux:
sudo pacman -S powercap-utils
3. Core Concepts of the Power Capping Framework
The framework is organized as a hierarchy, which you navigate using the tools.
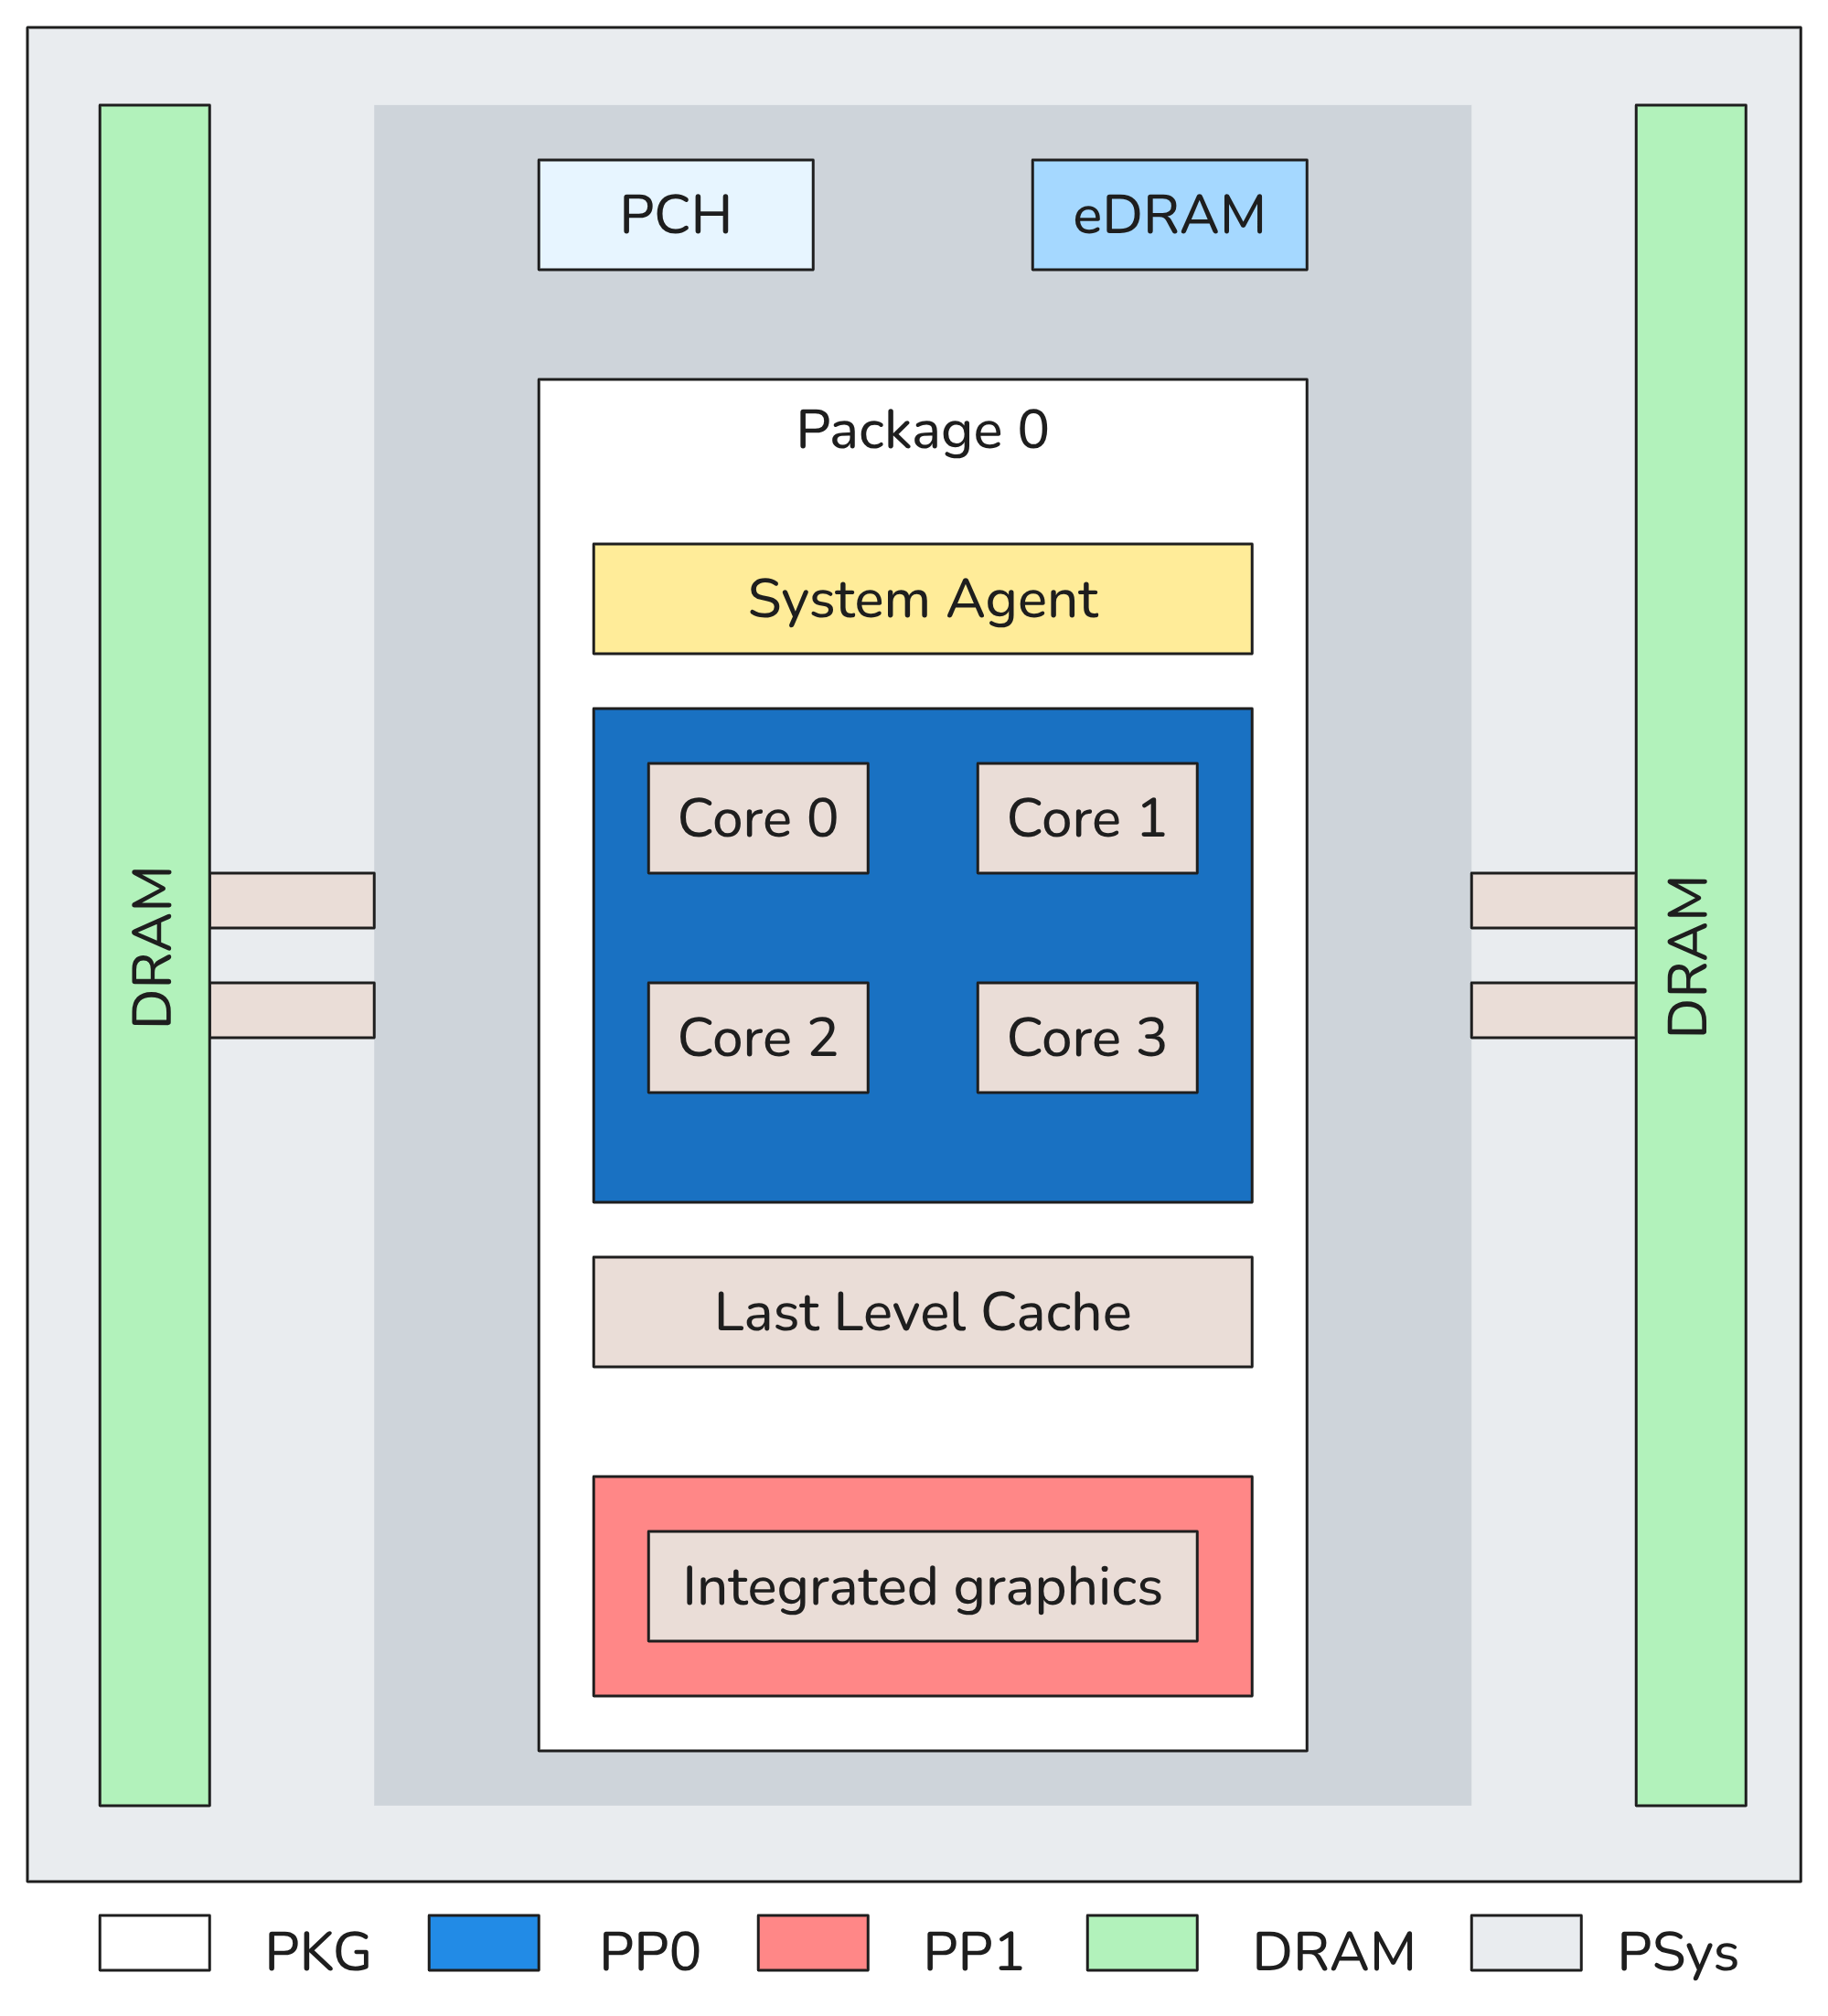
Figure — RAPL domains: package, core, uncore, and DRAM.
- Control Type: The top-level driver. This will be
intel-raplon Intel systems. - Zone: A device or a part of a device that can be power-managed. Common zones are:
-
package-0(or0): The entire CPU socket. This is the most important zone. -
core(sub-zone): A group of CPU cores. -
uncore(sub-zone): Components like the L3 cache and memory controller. -
dram(sub-zone): The DRAM interface.
-
- Constraint: A specific power limiting rule within a zone.
-
Constraint 0: Thelong_termlimit. This is the sustained power limit, similar to the CPU’s TDP (Thermal Design Power). -
Constraint 1: Theshort_termlimit. This is a higher power limit that the CPU is allowed to use for a short burst of time.
-
- Parameters: Each constraint has settings you can read and write:
-
power_limit_uw: The power limit in microwatts (µW). -
time_window_us: The time period in microseconds (µs) over which the power limit is enforced.
-
⚠️ Critical Note on Units: The tools operate in micro-units. This is the most common source of error.
- To set a limit of 50 Watts, you must use
50000000microwatts.- To set a time window of 1 second, you must use
1000000microseconds.
4. The Tools: powercap-info and powercap-set
Part 1: Exploring with powercap-info (Read-Only)
powercap-info is your tool for discovery. It’s safe to use as it only reads information.
1. List all power capping control types and their full hierarchy: This is the most common command to get an overview of your system.
powercap-info
Output (example from an Intel CPU):
intel-rapl
└── package-0
    ├── core
    ├── uncore
    └── dram
This shows the control type is intel-rapl and the primary zone is package-0.
2. Get detailed information for a specific zone: Based on the --help output, the correct syntax is powercap-info <control-type-name> -z <zone-id>.
Let’s inspect package-0, which corresponds to zone 0.
powercap-info intel-rapl -z 0
Output (abbreviated):
package-0:
  enabled: 1
  energy_uj: 1234567890
  constraints:
    0: long_term
      power_limit_uw: 65000000
      time_window_us: 28000000
      name: long_term
    1: short_term
      power_limit_uw: 85000000
      time_window_us: 2441
      name: short_term
Explanation:
- This package has a
long_termlimit (constraint0) of 65,000,000 µW (65 W). - It has a
short_termlimit (constraint1) of 85,000,000 µW (85 W). -
energy_ujis the total energy consumed (in microjoules) since boot.
3. Get a single value: The --help shows many flags to query specific values. For example, to get only the power limit for the long_term constraint:
# Syntax: powercap-info <control-type> -z <zone> -c <constraint> --c-power-limit
powercap-info intel-rapl -z 0 -c 0 -l
Output:
65000000
This is excellent for scripting, as it gives you a clean number to work with.
Part 2: Setting Limits with powercap-set (Write/Modify)
powercap-set is used to change the power settings. You will need sudo for this.
Syntax: sudo powercap-set <control-type-name> [options]
Key Options:
-
-z, --zone=<zone-id>: Specifies the zone to modify (e.g.,-z 0). -
-c, --constraint=<constraint-id>: Specifies the constraint (0for long_term,1for short_term). -
-l, --c-power-limit=<uw>: Sets the power limit in microwatts. -
-s, --c-time-window=<us>: Sets the time window in microseconds. -
-e, --z-enabled=1|0: Enables (1) or disables (0) an entire zone.
Example Workflow: Limiting a CPU to 35 Watts
Let’s cap the entire CPU package (package-0, which is zone 0) to a sustained 35 Watts.
Step 1: Identify the current limits.
powercap-info intel-rapl -z 0 -c 0
Let’s assume the current limit is 65000000 (65W).
Step 2: Set the new power limit. We want to set a 35W limit for the long_term constraint (ID 0). 35 Watts = 35000000 microwatts.
sudo powercap-set intel-rapl -z 0 -c 0 -l 35000000
Step 3: Verify the change.
powercap-info intel-rapl -z 0 -c 0 -l
New Output:
35000000
Success! The CPU’s sustained power limit is now 35W.
5. Practical Example: Setting a Custom Boost and Sustained Limit
Goal: Configure a CPU to run at a sustained 60W but allow it to boost to 90W for up to 15 seconds.
1. Set the long_term (sustained) limit:
- Constraint:
0 - Power: 60W =
60000000µW
sudo powercap-set intel-rapl -z 0 -c 0 -l 60000000
(The default time window for long_term is usually fine, so we don’t need to set it.)
2. Set the short_term (boost) limit:
- Constraint:
1 - Power: 90W =
90000000µW - Time Window: 15 seconds =
15000000µs
sudo powercap-set intel-rapl -z 0 -c 1 -l 90000000 -s 15000000
3. Verify all settings:
powercap-info intel-rapl -z 0
Check the output to confirm that both constraint 0 and constraint 1 now reflect your new values. The CPU will now adhere to this custom power profile.
6. Scripting and Automation
Because the tools can output clean numbers, they are perfect for scripts.
Example: A script to toggle a “low power” mode (25W) and a “high power” mode (80W).
power-mode.sh
#!/bin/bash

# Check for root privileges
if [[ $EUID -ne 0 ]]; then
   echo "This script must be run as root"
   exit 1
fi

MODE=$1
CONTROL_TYPE="intel-rapl"
ZONE="0"
CONSTRAINT="0" # We will only change the long_term limit

if [[ "$MODE" == "low" ]]; then
    POWER_LIMIT_UW=25000000 # 25 Watts
    echo "Setting low power mode (25W)..."
elif [[ "$MODE" == "high" ]]; then
    POWER_LIMIT_UW=80000000 # 80 Watts
    echo "Setting high power mode (80W)..."
else
    echo "Usage: sudo $0 <low|high>"
    exit 1
fi

powercap-set "$CONTROL_TYPE" -z "$ZONE" -c "$CONSTRAINT" -l "$POWER_LIMIT_UW"

# Verify
CURRENT_LIMIT=$(powercap-info "$CONTROL_TYPE" -z "$ZONE" -c "$CONSTRAINT" -l)
CURRENT_LIMIT_W=$((CURRENT_LIMIT / 1000000))
echo "Successfully set power limit to ${CURRENT_LIMIT_W}W."
How to use the script:
chmod +x power-mode.sh

# Set low power mode
sudo ./power-mode.sh low

# Set high power mode
sudo ./power-mode.sh high
7. Conclusion
powercap-utils gives you precise, low-level control over your CPU’s power consumption. By understanding the hierarchy of control types, zones, and constraints, you can effectively use these tools to manage thermals, optimize performance, and control energy usage.
Key Takeaways:
- Use
powercap-infoto explore the available zones and constraints on your system. - Use
sudo powercap-setto apply limits, always remembering that units are in microwatts and microseconds. - The primary targets are usually
zone 0(package-0), withconstraint 0(long_term) for sustained limits andconstraint 1(short_term) for boost behavior. - The single-value flags (like
-lforpowercap-info) are incredibly useful for scripting and verification.
Enjoy Reading This Article?
Here are some more articles you might like to read next: